You can draw, and you have easy access to a laser cutter, CNC router and vinyl plotter at The Edge, but how can you put these things together? By turning your drawings into machine-cuttable files, of course!
The blade, bit or beam of a cutting machine ‘cuts’ shapes by moving across the surface of a material similarly to how you might cut a sheet of paper by hand with a knife. We need to tell the machine that path in a way it understands.
What type of images do cutting machines use?
There are two types of images we can create on computers: raster and vector.
You’ve likely created thousands of raster images before without realising – especially if you enjoy taking photos with your phone. Raster images tell the computer how to colour a picture based on an underlying grid composed of tiny squares (pixels).

See the underlying grid beneath this photograph when we make it larger - each square is a pixel that can contain only one colour, and the image quality changes when we try to make it bigger than its orginal size.
If you tried to cut (or draw) a circle by hand by going directly from square to square on grid paper, you’d end up with little diagonal lines whenever the shape curves – it wouldn’t be smooth at all! This is where vectors come in.
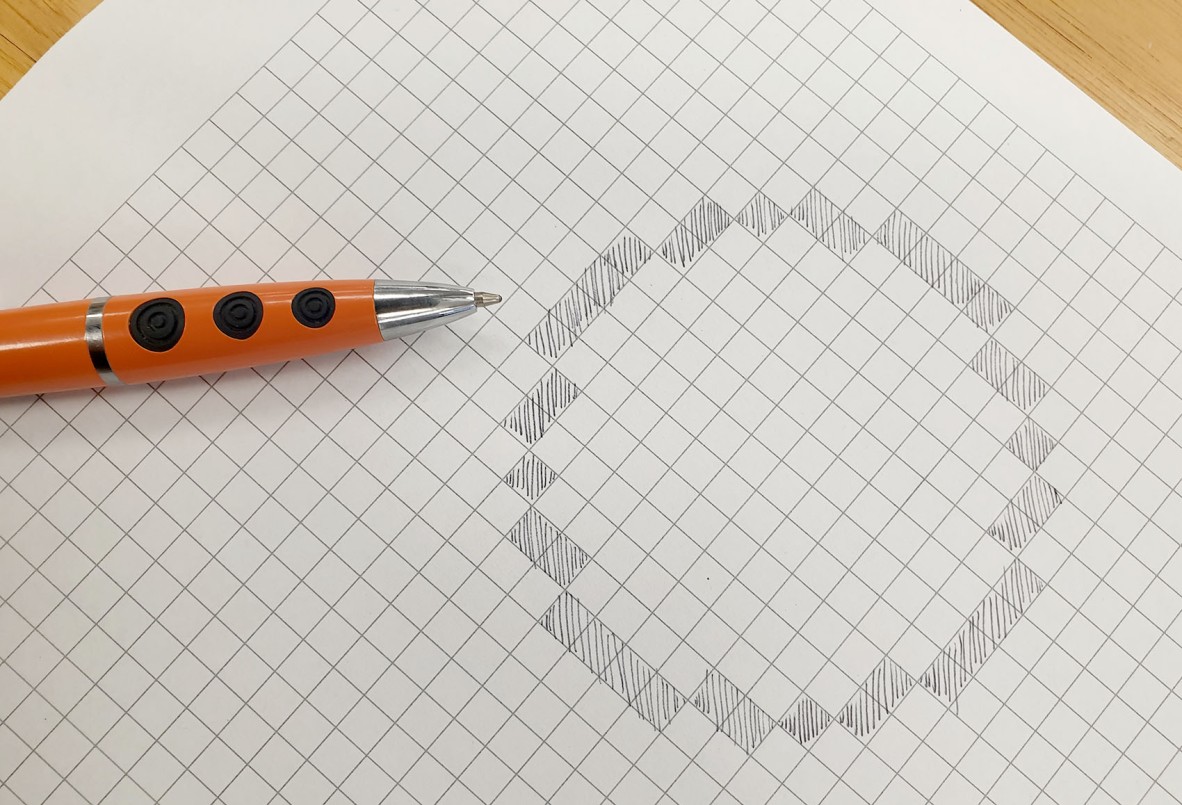
If we tried to cut this circle out following just the information provided, it would not be precise. With a compass, we could be far more accurate.
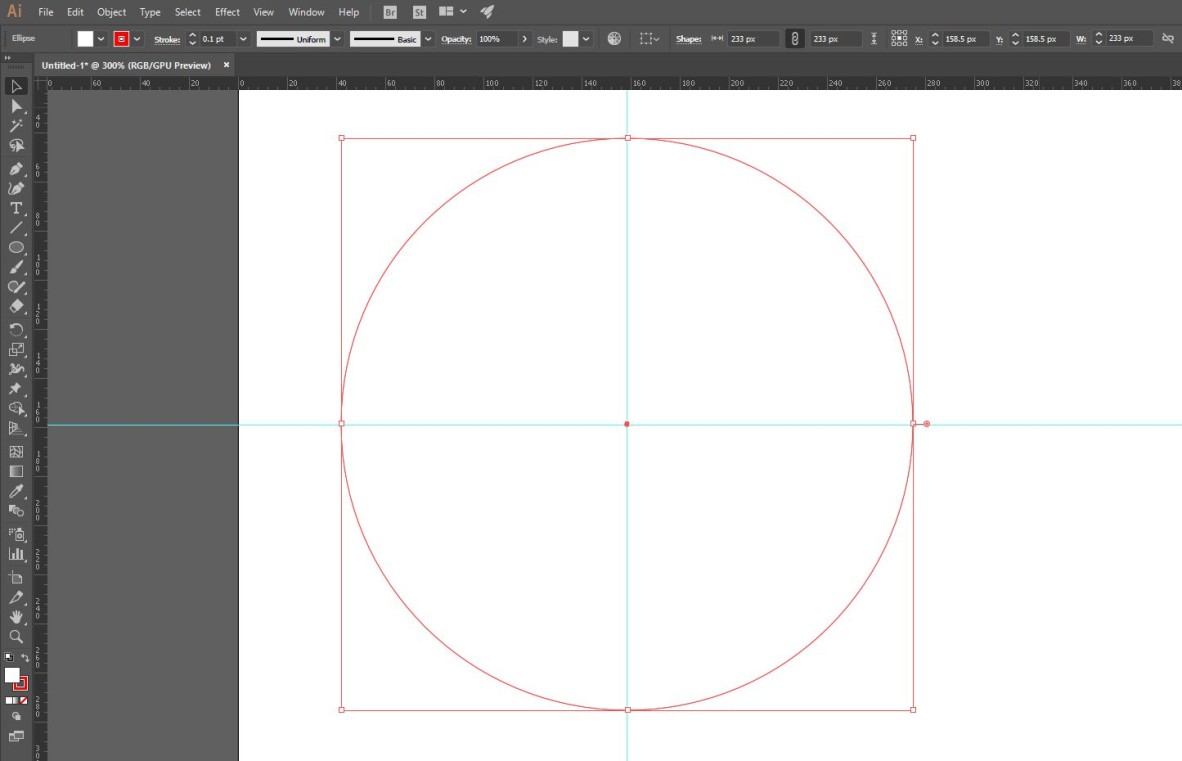
Vector images don’t need a grid to work, because mathematical formulas tell them where to move instead. Ie, to cut a circle, it would use the information that a line for a circle is equal distance in all directions from the central point. If we were cutting (or drawing) a circle by hand, we could use a compass to do the exact same thing - a perfect circle with no jagged edges!
The good thing is, when creating vector files that laser cutters, CnC routers and vinyl plotters can understand, we don’t need to do the tricky maths ourselves – software can do all the hard work for us! An added benefit is that once a vector file has been created, because it is based on maths (instead of set points on a grid), we can scale it up or down as much as needed with no loss of quality.
How can I create vector files simply?
Software is available to create vector files – or even convert your drawings to vector with just a few simple steps (using image tracing tools).
Some that people regularly use are Adobe Illustrator (available at our Digital Media Lab) Corel Draw (available on our Fabrication Lab HP Laptops) and Inkscape (available for free download). Fusion 360 and VCarve perform specialised functions for parametric design and CNC milling, and are also available on the HP Laptops.
If your drawing is very geometric, you can dive straight into designing it in one of these programs – our Wiki has a great tutorial for Inkscape to get you started, or we’ve put together a simple guide to free resources to learn these programs.
If your drawing is very organic or detailed, scanning it in or taking a high quality photograph first is a good place to start. Then you can pop your raster picture into the software and design your vector on top (using it as a guide), or take advantage of Image Trace tools to do the work for you instead! Here are some links to how to use Image Trace in Inkscape and Adobe Illustrator.
Some drawing tips (if you intend to use Image Tracing Tools):
-
Draw with flat, contrasting colours where possible. This will ensure that the tracing tool can accurately distinguish between the different areas of your drawing.
-
Don’t outline your shapes, unless you intend it to trace the outline separately. Eg:
-
If you draw a circle outline with a black marker against a white background, the computer sees three areas (the white background, the black circle, and then the white inside the circle) – you would have to delete out the centre white shape and edit the black shape to get one solid shape to cut.
-
If you filled the circle with the black, the computer only sees two shapes (the white background, and the black circle) – once you delete the white area and apply the right outline colours, the machine would cut one solid shape.
-
-
Remove everything that you don’t want to trace. Sometimes this means redrawing your desired image on a new white piece of paper.
-
Make sure your source photo/scan is at a good resolution. Pixilated images will produce poor results (humans can visually interpret a drawing and tell what we want, but computers aren’t always great at guessing)!
-
Avoid using it for exact geometric shapes – It is unlikely to give you the result you’re looking for, and you are likely better to draw them directly in the vector program.
Designing for Cutting Machines Doesn’t Have to be Hard
It can be, but it doesn’t have to be! If you can draw with pen and paper, it’s not too many more steps to turn that into something you can cut on a Laser Cutter, CnC Router, or Vinyl Plotter.

You can create basic shapes in vector programs with very little prior experience. Apply the right settings, and machines can then cut those shapes.
| Remember, if you hit a roadblock trying to prepare a file for cutting, you can always pop by The Edge’s Fabrication Lab during Open Lab hours to get some guidance or come along to Hack the Evening (our weekly maker meet-up) and we can give you a hand completing one of the vector drawing tutorials on our wiki. We’re always happy to help! |
Comments
Your email address will not be published.
We welcome relevant, respectful comments.